This chapter contains the following topics:
Introduction to Load A/R Open Items
You use the Load A/R open items selection to transfer outstanding accounts receivable items from your former A/R program or manual system directly into A/R Open Items. No other A/R data is affected by this selection.
This selection is not under batch control and does not require posting.
|
Note |
Following the setup of PBS A/R under normal usage you should not use this selection. It is recommended that you only allow a PBS administrative user to access this function as a user can add, change or remove open items. Erroneous change could greatly affect your business in a negative way. |
Converting to PBS Accounts Receivable
Once all outstanding items have been entered and you have converted over to the PBS Accounts Receivable module, you no longer need Load A/R open items (Enter). Current accounts receivable activity is entered through Invoices, Cash receipts and Miscellaneous charges. Invoices, credit memos and payments may also be entered and posted to open items from Order Entry, Point of Sale and Customer Orders.
Editing Existing Open Items
Use this selection with caution when editing existing open items. There is no edit list, posting report or audit trail. It is recommended that you do not make changes to open items using Load A/R open items unless absolutely necessary. It is also recommended that you only provide access to this menu selection for PBS administrative users.
|
Note |
You may use this selection to view and modify the Terms, Due date, Amount-1, Amount-2, P.O.#, and Reference for most existing open items. For invoice type open items you may also modify the Sales rep and Commission fields if sales reps and commissions are used. However, it is highly recommended that you do not change the Customer number, Document number, Amount-1 and Amount-2 fields. Changing an amount will not be reflected in distributions. If you need to reverse or adjust an amount, enter the appropriate credit memo, debit memo, negative cash receipt or whatever applies to the situation. Also, for changing the apply-to number or due date, we recommend that you use the functions in Open items (Change apply-to number or due date). |
Before you begin you may want to print a list of your A/R open items using Reports, general (Open items) as the report lists open items created by all A/R functions, not just by Load A/R open items (Enter). When you are finished loading open items, run the report again to compare the differences. You may also want to run the aging report before and after.
Follow these steps to change over from your former system to the PBS Accounts Receivable module:
| • | Determine the cut-off date to be used. The cut-off date is the latest date for items that you will enter (load) here. For example, if you choose a cut-off date of 3/31, you will enter open items dated 3/31 and earlier. |
| • | Enter these items into the A/R Open Item file through Load A/R open items (Enter). |
For open item customers, enter the items separately for proper aging and discounts. If you don’t want the A/R module to do aging or calculation of discounts, you may enter only the customer balances as of the cut-off date.
| • | Run Set customer account balances, as described in the Set Customer Account Balances chapter. This is the only time that you will ever use this selection, unless you are restoring your Customers following loss of the original data. |
| • | The changeover is complete. Enter all open items after the cut-off date as new transactions, using A/R Invoices, Miscellaneous charges, O/E Orders, P/S Transactions or C/O orders. |
Select
Load A/R open items from the Utility menu.
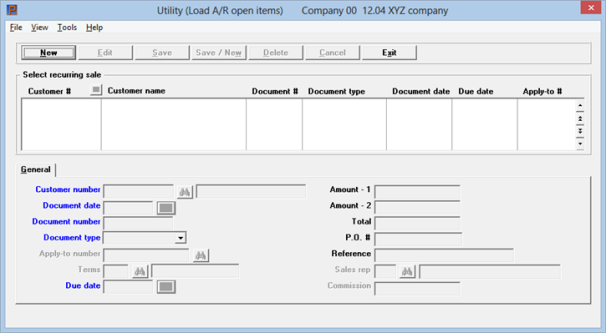
The following screen appears:
Graphical Mode

The list box displays up to 6 existing open items at a time. You may sort the open items by customer number in ascending or descending order. Only column names in red may be sorted. To select or change the sort order, click on the column name or the arrow to the right of the column name or use the View options from the menu.
To locate an open item, start typing a customer number. You may also use the up/down arrows, Page up, Page down, Home and End keys to locate an invoice. The <F1> and <SF1> keys function the same as the up/down arrow keys.
Open items that display in the list box are available for changes or deletion. The fields for the selected open item display in the lower part of the screen.
When an open item is found, you may select the <Enter> key or Edit button to start editing.
You have the following options with the buttons and keyboard equivalents:
| Button | Keyboard | Description |
|---|---|---|
|
New |
Alt+n |
For entering a new open item |
|
Edit |
Alt+e |
For editing an existing open item |
|
Save |
Alt+s |
For saving the addition of the open item or for saving the changes to an existing open item |
|
Save/New |
Alt+w |
This is a combination of the Save and New buttons. The customer number, document date, document number, type, terms and due date are retained from a previous entry. |
|
Delete |
Alt+d |
To delete an open item |
|
Cancel |
Alt+c |
To cancel adding or editing an open item. Your entries will not be saved |
|
Exit |
Alt+x |
To exit the load A/R open item window |
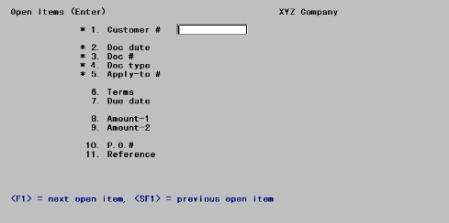
Character Mode

From this screen you can work with both new and existing open items.
Enter the following information:
Enter the customer number for the open item. You may use this option:
|
Lookup button or <F8> |
To access a list of customers from which you may select one. Using graphical mode you may also click on the Customers button to add a new customer |
Running in character mode, for an existing entry, you may also use one of these options:
|
<F1> |
For the next open item entry on file |
|
<SF1> |
For the previous entry |
|
Format |
12 characters. The default is the customer number of the previous entry in this session, if there was one; if not, there is no default. |
|
Example |
Type 200 |
Enter the document date of the open item.
|
Format |
MMDDYY. The first time you reach this field, the default is the current date. Thereafter, the default is the previously-entered document date. |
|
Example |
Type 30315 |
Enter the document number of the A/R open item. You may leave this field blank, in which case a cash payment is assumed. Cash displays in this field, Payment displays in the next, and the cursor moves to the Apply-to number field.
|
Format |
8 characters, in the format defined as the Default doc # format in Control information. If a valid format is entered the numeric portion of the document number is incremented automatically with each entry. |
|
Example |
Type 3002 |
If your entry for the previous field was blank for Cash, this field is automatically set to Payment.
Otherwise, enter the document type for this open item:
| Character mode | Graphical mode |
|---|---|
| B | Balance forward |
| F | Finance charge |
| C | Credit memo |
| P | Payment |
| D | Debit memo |
| R | Returned check |
| I | Invoice |
| N | Prepaid payment |
| L | Layaway * |
N
|
Format |
One letter from the list above. The default is Invoice. |
|
Example |
Press <Enter> |
* For a new entry, a Layaway type payment must originate from Point of Sale as it must be assigned to a specific invoice in Point of Sale. It could exist in Point of Sale but has not yet been posted. Using end of day Post first. Unless the Layaway payment exists in Point of Sale do not enter a Layaway type here.
Enter the number of the document to which this document applies. Any entry is accepted, and no test is made that this is a valid invoice.
Open Item Customers
For an invoice, debit memo, balance forward document, or finance charge, the document number (Field #3. Doc #) is automatically repeated here and the cursor skips this field. In the case of a debit memo, it is not always true that the two are the same; so you may have to change the apply-to number from Field number to change ?.
For a credit memo, payment, or returned check, an apply-to number may be entered. The field may also be left blank, in which case the word * Open * displays to indicate this is an open credit on account (not applied to a specific invoice).
Balance Forward Customers
The apply-to number is only meaningful for open-item customers, but nevertheless appears on balance-forward customers for all document types except payments (for which this field is always blank). For other document types, the document number (Field #3. Doc #) is automatically repeated here and the cursor skips this field.
|
Format |
8 characters |
|
Example |
(Displays automatically in this example because this is an invoice) |
New and Existing Entries
If an open item exists for the values entered in Fields #1 through 5, its values will display in the remaining fields and the cursor will move to Field number to change ?. No two entries can have the same values for these five fields.
If no open item already exists for these values, this is assumed to be a new entry and the cursor moves to the next field to continue data entry.
For a credit memo, payment, finance charge, or balance forward document, this field is skipped.
For a debit memo, this field is automatically set to the customer’s usual terms and may not be changed.
For an invoice, any valid terms code may be specified:
| • | When editing an existing open item the cursor is positioned in the field as usual. |
| • | When entering a new open item data entry is in two steps. First choose one of the options: |
|
<F2> |
To default to the customer’s usual terms code from |
|
<Enter> |
Character mode feature only: To override the customer’s terms code. The cursor moves back to the Terms field to require data entry. |
Options
<F1> and <SF1> are not available, but <F8> may be used to view all valid terms codes.
|
Format |
3 characters |
|
Example |
Press <F2> |
Enter the date when the invoice, debit memo, or finance charge is due to be paid, or when the payment or returned check was supposed to have been paid. A valid date must be entered or defaulted for all document types.
|
Format |
MMDDYY. For an invoice the default is the due date computed from the terms code in the Terms field. For a finance charge, there is no default. For all other document types, the default is the document date from the Doc date field. |
|
Example |
Press <Enter>. Since this customer’s payments are due in 25 days, a date of 03/28/15 is displayed. |
Enter these two amounts, which have the following meanings for different document types:
| Document type | Amount - 1 | Amount - 2 |
|---|---|---|
|
Invoice |
Discountable amount |
Non-discountable amount |
|
Balance forward |
Full amount |
N/A (forced to zero) |
|
Payment |
Cash receipt amount |
Discount + Allowance |
|
Finance charge |
Finance charge amount |
N/A (forced to zero) |
|
Format |
999,999,999,999.99- at each field. A minus sign is not required for credit memos and payments. The software will deduct the amounts of these document types from a customer’s balance. |
|
Example |
Type 715.45 for the discountable amount Type 69.42 for the amount not subject to discount. |
Total
The total of Amount - 1 and Amount - 2 displays automatically upon entry of both.
Enter the customer’s purchase order number. This field is optional.
|
Format |
15 characters |
|
Example |
Press <Enter> |
Enter comments appropriate to the A/R open item. This field is optional.
|
Format |
25 characters |
|
Example |
Type Regular purchase |
If you specified in Control information that you do not employ sales representatives, or that you do not pay them by commissions, this field and the next do not appear on the screen at all. Such is also the case if you base commissions on sales rather than on payments.
Otherwise:
| • | If this document is a payment, a returned check, or a finance charge, this field displays as Not applicable and may not be entered. |
| • | If this document is an invoice, a debit / credit memo, or a balance forward, enter the code of the sales representative entitled to receive the commission. |
When entering an existing item, the cursor is positioned in the field as usual.
Options
When entering a new item, data entry is in two steps. First choose one of the options:
|
<F2> |
For the customer’s usual sales rep from Customers. The cursor then moves to the Commission field. |
|
<Enter> |
Character mode only: To override the customer’s sales rep. The cursor moves back to the Commission field to allow data entry. |
Using character mode, <F1> and <SF1> are not available to select a sales rep. <F8> may be used to view all valid sales representatives and select one.
|
Format |
3 characters |
|
Example |
(This field does not appear in this example) |
This field appear on the screen, and can be entered, whenever the Sales rep field can be entered.
Enter the amount of the commission which will become due to the sales rep when this open item is fully paid (as discussed in the chapter titled Fully Paid Open Items). No default value is calculated and your entry is not checked against the Amount 1 and Amount fields.
|
Format |
99,999,999.99- |
|
Example |
(This field does not appear in this example) |
Graphical Mode
Select the Save button to save your changes. Also see the Load A/R Open Item Buttons for the other options.
Character Mode
Field number to change ?
Make any needed changes, then press <Enter> to process another entry. For an existing entry, you may also use one of the options:
|
<F1> |
For the next open item entry |
|
<SF1> |
For the previous entry |
|
<F3> |
To delete this entry |
Changing open items can result in missing or incorrect customer billing data. Please be sure you are absolutely certain that the changes you are going to make are completely relevant and correct.
Changes to Customer number through Apply-to # (fields 1 through 5) are allowed with the following exceptions:
| • | Even for new entries, any attempted change which would result in a duplicate entry is rejected. |
| • | Changes to the Document type field (field 4) are not allowed if commissions are used and if the doc number is *Open *. |
| • | Changes to the Apply-to # field (field 5) are not allowed if it is a balance forward customer. |
| • | A Layaway type payment must originate from Point of Sale as it must be assigned to a specific invoice in Point of Sale. It could exist in Point of Sale but has not yet been posted using end of day so Post first. Unless the Layaway payment exists and is attached to a Point of Sale invoice , do not change any type a Layaway type here. |
This report lists all A/R open items currently on file, not merely those entered by Load A/R open items (Enter).
Select
Open items from the Reports, general menu.
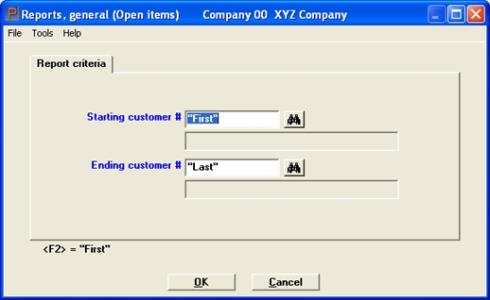
The following screen appears:
Graphical Mode

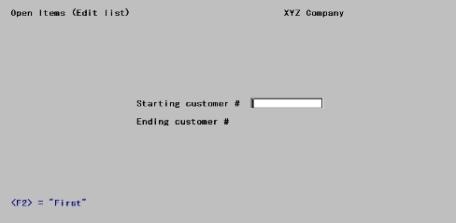
Character Mode

Enter the following information:
Starting customer # and
Ending customer #
Specify the range of customer numbers to appear on the report. You may also use the option:
|
<F2> |
For the First starting customer or Last ending customer |
Options
You may use the option:
|
Format |
12 characters |
|
Example |
Press <F2> at each field |
Select OK to print the report or Cancel to return to the menu without printing.
Character Mode
Any Change ?
Respond Y to re-enter the screen, or N to print the A/R Open Item File Edit List.